
How to Make a Basic Homecoming Mum
by Todd Steinberg
Ever wanted to know how to get starting in the mum-making business or hobby? We put together a tutorial to get you started. Let's start with what you need to get going:
- Standard incurve chrysanthemum bloom
- Cardboard shield or backing
- #9, #3, & #1 ribbon matching school colors
- Accessories
- Scissors
- Hand stapler
- Hot glue gun

Preparing Shield/Backing (Part 1)
- Cut 7 six-inch strips of #9 ribbon (Color A) and 7 six-inch strips of #3 ribbon (Color B)
- Cut 6 six-inch strips of #9 ribbon (Color B) and 6 six-inch strips of #3 ribbon (Color A)
- Lay a strip of #3 ribbon along a strip of #9 ribbon of the opposite color. The shiny side of both pieces should be facing up.
- Take the ends of the ribbons between the thumb and forefinger of each hand.
- Bring the ends together to form a point.
- Staple the ends together.
- Continue until all 13 points are made.
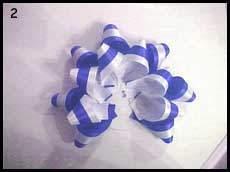
Preparing Shield/Backing (Part 2)
- Staple the points onto a cardboard shield or backing.
- With Color A: Position the 7 identical points to form the outside row of points around the shield. Staple the first three points at the 12-, 9-, and 3-o'clock positions.
- Fill the remaining four points in between the three already positioned.
- With Color B: Position the 6 identical points to form the inside row of points around the shield.
- Fill these points between the points of the outside row.

Preparing Streamers
- Using #9 ribbon, cut 10 thirty-inch streamers. (This length can vary depending on the desires of the designer.) Make 5 of the streamers using color A and 5 using color B.
- If desired, put lettering on the streamers. Use pre-made letters or make them using glue and glitter.
- Cut another 30" streamer of either color A or B. Lay this streamer shiny side up on the table.
- Working to the left and alternating colors, lay down 5 streamers. They should overlap at the top and fan out towards the bottom.
- Staple these together.
- Follow the same procedure for the remaining streamers.
- Staple all streamers together.
- Staple the streamers onto the shield.

Accessories
- Purchase accessories for your mums from a hobby shop or Plush in a Rush
- Choose several accessories to add to the mum. They may include miniature footballs, helmets, bells, etc.
- Tie or glue the accessories to strands of #1 ribbon. Vary the length of ribbon strands.
- Staple the strands to the backing.

Braided Chains
- Braided love chains can be added to the football mum. Two popular types of chains are the two-stranded and three-stranded chains.
- Cut a 6’ section of ribbon from each of color A and color B. Use #3 ribbon.
- Staple the ends of the ribbon together to form an L. One strand should have the shiny side facing upward. The other side should have the dull side facing upward.
- Make a loop about 3/4" with the dull strand.
- Make a loop of equal size with the shiny strand. Bring this loop through the loop of the dull strand.
- Make a loop again with the dull strand and bring it up through the loop of the shiny strand.
- Follow this procedure, keeping the strands tight. However do no pull the strands too tight or else the chain will begin bending in an arch.
- When completed, staple the ends of the two strands together.
- Make a small bow using #3 ribbon. Hot glue the bow onto one end of the chain.
- Attach to the streamers.


Making Streamers
- Cut 8 six-inch section of #3 ribbon (4 of each color).
- Staple these together in a radiating manner.
- Trim the ends on a slant.
- Hot glue to the top end of the streamers.
- Cut 4 twelve-inch sections of #3 ribbon (2 of each color).
- Staples these together and attach as directed above.

Attaching Flower to Shield
- Using a hot glue gun, spread hot glue over the exposed shield.
- Attach the flower to the shield.
- Apply slight pressure until glue has dried.

Making a Large Bow
- Using two strands of #3 ribbon (one of each color), make a large bow about the same width of the completed shield.
- Glue the bow onto the small streamers, beneath the flower.
Finishing the Backing
- Take a 3 1/2-inch section of #9 ribbon.
- Fold it in half and staple onto another shield. This is where the mum will be attached to the garment.
- Glue this second shield onto the back of the corsage shield to cover any staples or mechanics.
- Be sure to hide any exposed staples so they will not snag the garment of the wearer.


Completing the Mum
- Trim streamer tails to make them all even. Notching them in a V-shape improves the overall appearance of the mum.
- If desired, lightly spray the entire mum with sparkling glitter. Good luck!
Hope you enjoyed this tutorial, be sure to check Pinterest for some awesomely creative mums.
From America's Plush Headquarters,
Todd Steinberg
Owner & Stuffed Animal Designer
Plush in a Rush
1.800.886.8602